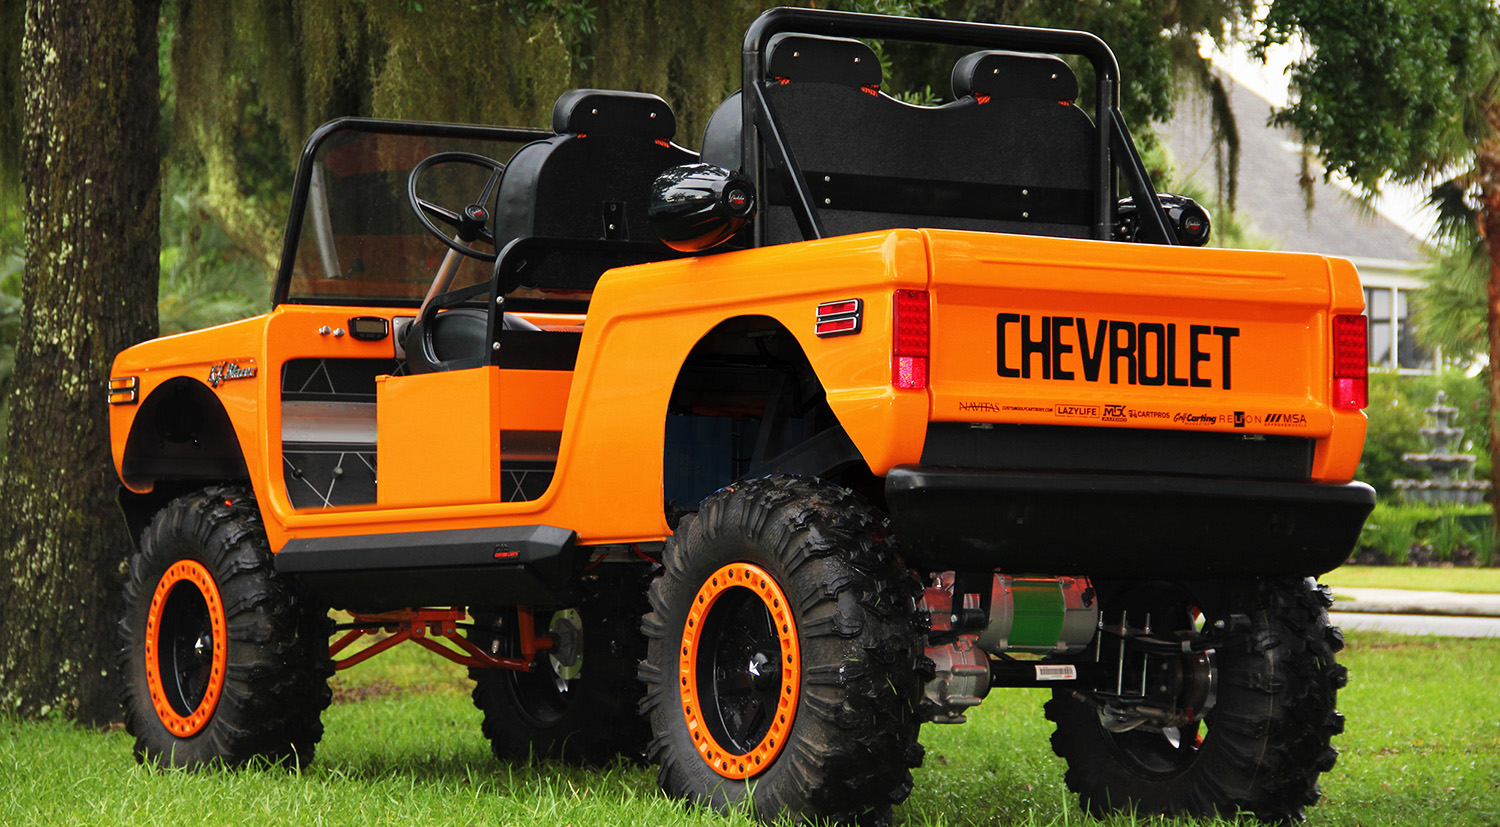
Before we do anything else, we have to take a minute to thank all the amazing sponsors and friends who either chipped in products, custom fabricated parts, donated their time or lent a physical hand building this super-custom, K5 Blazer-inspired golf cart. Thank you guys! We could not have done this without you, and we are more than appreciative.
– The Golf Carting Magazine Staff

Why a K5 Blazer Golf Cart?
 This project started as the brainchild of Christian Amico, President of Golf Carting Magazine who has a borderline unhealthy addiction to 1970’s Chevy K5 Blazers. He has built, customized, and restored half a dozen of them in the past ten years and currently owns two.
And Matthew Smith, Christian’s great friend and the owner of Charleston Custom Carts, who has also been bit by the same K5 Blazer bug and can often be seen driving around town in his custom 1973 K5 with the top off.
Both Christian and Matt had been contemplating taking on this project for over a year now and with the help from sponsors, friends, and the super-talented staff at Charleston Custom Carts they decided to jump in and get started.
Getting Started
The build began with a Club Car DS Transport, factory-stretched 6 passenger cart. After being completely stripped down to the frame it was acid-washed what seemed dozens of times. The frame required some welding and cleaning up since the cart came from a local business that really put it to work. After the frame was made over, it was ready for a body… but which one?
Build Pictures Gallery
The custom body stared off as a fiberglass Bronco-themed shell from Tony over at CustomGolfCartBody.com. Christian and Matt decided it was a solid base to start with and knew Tony made some great products.
 The Bronco-style body has similar dimensions, scaling, and style to a Blazer and it would be much easier to convert it to a Blazer than custom fabricating one from scratch. So, Tony shipped us a body and they got to work. To get the right Blazer shape, the shell had to be seriously modified, body worked, sanded, and painted. Big shout out here to Daniel our body and paint guy. The whole process took about a month. The wheel wells were trimmed out, the hood was shaved down and re-shaped, the truck bed area was bed-lined, and the dash was re-constructed. The roll-bar Tony sent was modified to mimic the 70’s Blazer style and two coats of paint and three coats of clear were applied.
Time to Go Shopping
 For the suspension, the guys really wanted to make a statement, so they went with an All Sports 11” lift and heavy-duty rear leaf springs. The lift was test fitted at Charleston Custom Carts, aligned, then removed and sent to be powder-coated to match the color of the cart.
With this massive height it was time to decide on the wheels and tires and for that Ryan over at MSA Wheels was kind enough to help us out and send in a set of the 16×7” M31’s wheels with color-matched (real) bead locks wrapped in 31” MotoRavage tires. Man did this setup really look amazing and more importantly, fit the style Matt and Christian were going for… 70’s Restomod!
High-Tech Innovations vs Old School Fabrication
The body from CustomGolfCartBody.com also came with a fiberglass grill insert that looked exactly like a Bronco grill from the late ’60’s. Christian’s first reaction was to toss it but it proved to come in handy for what would be one of the higher-tech innovations needed to pull this project off – a custom 3D designed and printed 70’s style Blazer grill.

In an earlier life, Christian went to school for graphic design so he had already mocked up a digital rendering of this cart to use as a baseline for fabrication but when it came to the grill, the guys were scratching their heads on how to fabricate such a complicated part. They toyed around with cutting up an original grill and making it smaller, but that would have taken forever to get perfect.
They decided to go the high-tech route and custom 3D scan and digitally model an original grill from a 1972 Blazer, shrink it down, then 3D print it. With the help of Christian’s friend Chris, who 3D prints parts for F1 racing teams (I know right… Mr.CoolestJobEverFancyPants) they were able to produce a miniature-sized grill that looks like an exact copy. It took 3 days to actually print it into four sections then had to be epoxied together, primed, and painted.
Miles of Wires
 While the body was getting prepped, sanded, cut and painted, Matt put one of his top techs, Bill Cole, on the project of wiring this beast. No small task but thanks to MTX, Navitas, and Relion Battery who were gracious enough to send a ton of amazing parts and accessories, all of which needed new custom wiring, Bill persevered and got the job done.
 MTX Audio sent us six speakers, two amps, a 12” subwoofer (mounted in a custom-built enclosure under the rear of the cart), a head unit, and all the cabling and controllers needed to shake the ground.
RELiON Battery sent in not one, not two but SIX of their InSight 48-volt Lithium Batteries that power this behemoth. And Navitas sent us their Club Car 600-AMP 5KW DC to AC Conversion Kit, which comes with a motor, controller, and the dash-mounted adjustment panel to dial in the speed, torque, and acceleration.
 With all these top-of-the-line products and a built-in onboard Delta-Q charger supplied by CartPros.com, the wiring had to be perfect. Bill decided to use 2-gauge (orange) wire for the batteries, controller, and motor which turned out to be right around 80 feet of custom cut, crimped, and soldered cable for worry-free all-weather driving.
With all the MTX gear and accessories we stuffed into this cart it was a challenging three days of work for Bill. Three 30-amp voltage reducers were used to power everything including the electric folding side steps from Amp Research which needed higher amperage than your normal golf cart accessories. The steps (and the headlights) were also wired to period correct chrome pull switches in the dash.
Let’s Accessorize, But Not Too Much
With all the big stuff out of the way Christian and Matt turned their attention to the overall look and style of the cart which proved to take some time trying new parts and accessories for the perfect fit.
“Oftentimes when you’re building a themed golf cart it’s easy to go overboard with logos, paint, graphics, and accessories. For this build we had to find the fine line between simplicity while trying to pay homage to the K5 and not be tacky.” explained Amico.
 The guys knew the seats would play a big part in the overall look and they wanted to make sure they would have that classic feel, so Christian ordered some period-correct orange houndstooth fabric and sent it directly to Ashley at Lazy Life Seats to work his magic. Lazy Life incorporated the houndstooth perfectly, matched the 70’s style and knock out of the park.
Genuine K5 emblems, badging, side marker lights, taillights, decals, switches, bumpers (which were original 72 Blazer bumpers that were cut, shrunk, and welded back together) really set off the look and style of the 70’s era. Our fabrication guys really knocked it out of the part making everything fit, thanks Pat and Jeff!
Final Pictures Gallery
Time to Burn Some Rubber
Not only does this cart look amazing and turn heads but it drives like a racecar. With the max speed of 49mph the acceleration is neck-snapping and on dirt or loose gravel the tires are impossible not to spin. Thanks to the Navitas’ setup it can be adjusted down for normal driving and locked so it can’t be tampered with.
The cart’s range is impossible to tell unless you plan on driving for quite a distance. Based on the calculation from the techs at Charleston Custom Carts it should get well over 100 miles of drive time on a charge thanks to the half -dozen RELiON 48-volt lithium batteries.
“This cart was super fun (and challenging at times) to build and I’m happy that Golf Carting Magazine could help pull it all together. I think it really came out amazing. Over 400 hours of labor went into designing, building, and fabricating this cart and my kickass team really pulled through and went the extra mile. This is by far the most enjoyable golf cart I have ever driven.” said Matthew Smith smiling.

Again, we would like to thank all of the sponsors, vendors, friends and staff that helped out. If you would like to learn more about any of the parts and accessories used in this cart build, please visit their websites below.
www.customgolfcartbody.com – www.relionbattery.com – www.navitasvs.com – www.americanliftkits.com – www.msawheels.com – www.efxtires.com – www.charlestoncarts.com – www.lazylifeseat.com – www.cartpros.com – www.mtx.com – www.amp-research.com – www.golfcarting.com


